Now we’re focusing on a crucial component of photography – ISO sensitivity. Understanding ISO is like having a secret ingredient that brightens up your shots in any lighting situation. Let’s dive into the world of ISO and learn how to manage noise for cleaner, crisper photos.
ISO: The Light Sensitivity Setting
Low ISO settings, such as 100 or 200, make the camera sensor less sensitive to light, resulting in darker images. These settings are ideal for bright, sunny days or well-lit environments. Using a low ISO helps produce images with minimal noise or grain, with crisp details and accurate colors. This setting is perfect for outdoor photography on bright days, studio photography with controlled lighting, or any situation where there’s ample light. It’s also great for capturing landscapes, architecture, and other static scenes where image clarity and detail are paramount.
High ISO settings, such as 800, 1600, or higher, increase the camera sensor’s sensitivity to light, making it easier to capture well-exposed images in low-light conditions. However, high ISO can introduce noise or grain into your photos, with the higher the ISO, the more noticeable the noise. Despite this, modern cameras have significantly improved high-ISO performance, allowing for cleaner images even at higher sensitivities. High ISO is useful for indoor photography, night shots, concerts, events, and any scenario where lighting is insufficient. It’s particularly handy for action photography in low light, where a faster shutter speed is needed to freeze motion.
Less Noise with a Higher ISO?
It’s crucial to experiment with different ISO settings in various lighting conditions to understand how your camera performs and to find the optimal settings for different scenarios. It’s important to note that ISO 100 on one camera can produce very different results than ISO 100 on another. You may have heard the advice to “increase ISO until you find the highest ISO setting you’re comfortable using,” but this isn’t always the case. Sometimes, you can actually get less noise with a higher ISO. How is that possible?
The answer lies in modern technology, specifically in dual gain sensors, which many cameras now feature. A dual gain sensor uses two separate amplification circuits optimized for different ISO ranges. This means your noise levels don’t always increase when you increase the ISO. In a dual gain sensor, the camera switches from one amplification circuit to another at a certain ISO threshold. The lower range circuit is optimized for low ISOs, providing the best dynamic range and minimal noise. The higher range circuit is designed for higher ISOs, reducing noise that typically accompanies higher sensitivity settings. This technology allows the sensor to perform better in low-light conditions and maintain a higher dynamic range, offering clearer and sharper images even at higher ISO settings.
If you want to find out how your camera performs at different ISO settings, visit this wonderful website.
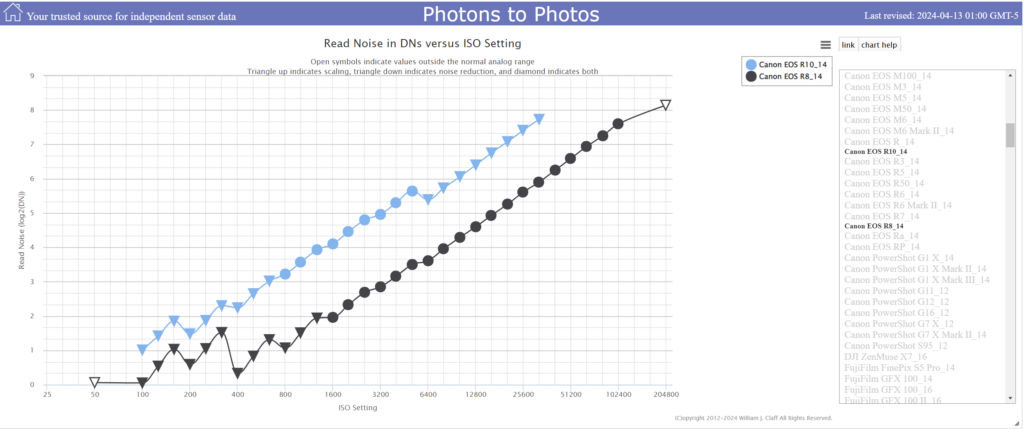
https://www.photonstophotos.net/ -> Read Noise in DNs Chart (2024-04-13)
https://www.photonstophotos.net/

In this table, I have compared two cameras: the Canon EOS R10 (blue) and the R8 (black).
You can see that when you use the R8, you get less noise at ISO 400 than at ISO 160. The amount of noise is the same when you use ISO 160 or ISO 800.
Managing Noise: The Unwanted Guest
Noise in photography refers to the grainy, speckled effect that often appears at higher ISO settings. There are two main types of noise:
1. Luminance Noise
Luminance noise appears as grain and affects the brightness of individual pixels. It looks like fine grain scattered across the image and is more tolerable because it can resemble film grain, adding a certain texture to photos. However, excessive luminance noise can reduce image clarity and detail.

2. Chrominance Noise
Chrominance noise, also known as color noise, appears as random color speckles, particularly in darker areas of an image. This type of noise can be more distracting and less visually appealing than luminance noise. Chrominance noise manifests as red, green, and blue dots and is often more noticeable in shadow areas or uniformly colored regions.

Post-processing software like Adobe Lightroom and Photoshop offer powerful noise reduction tools that help reduce noise while preserving details. Practical tips for mastering ISO include shooting in RAW, which retains more detail and provides greater flexibility for noise reduction during post-processing.
Tips for ISO Mastery and Noise Control
- Natural Light Advantage: Stick to lower ISO settings in natural light for cleaner images.
- Fast Action in Low Light: Increase ISO to maintain proper exposure when you need a fast shutter speed.
- Noise Reduction Tools: Use post-processing software to reduce noise and balance image clarity. Many editing programs have specific tools to address both luminance and chrominance noise.
- Know Your Camera: Each camera has an optimal ISO range. Experiment to find yours.
Creative Use of ISO
- Grainy Aesthetics: Use higher ISO intentionally for a grainy, vintage look. Photographers use high ISO intentionally to add a certain texture or mood to their photos, embracing the grainy look as part of their artistic vision.
- Low Light Atmosphere: Embrace noise in low-light scenes for added drama.
Understanding how your camera’s sensor works and experimenting with its ISO settings will help you achieve the best possible image quality, regardless of the lighting conditions. So, don’t just rely on generic advice—take the time to learn about your camera’s specific capabilities and limitations. This knowledge will empower you to make informed decisions about ISO settings and enhance your photography skills.